Thursday, July 22, 2010

Tomato Pie


Something's got to give when your tomato plants go berserk like mine have. Don't get me wrong, I am thrilled to have such beautiful, delicious tomatoes every day, but seriously...Homey just brought in 16 today. Sixteen! Grand total of 19 on my counter. Let's figure out how to use 'em up, for cryin' out loud!

I know tomato pie sounds weird, but honestly, it's not much different than a tomato sandwich...if you like tomato, cheese, and mayonnaise, you'll like this pie. Unless your name is Homey. This is the second year in a row that she has decided she's not a fan of tomato pie. Which is shocking since her favorite food (since babyhood!) is tomato. But I make it anyway, it doesn't last long around here. Serve it as a side next to a delicious steak or eat it with a green salad for lunch. Eat it while it piping hot, or enjoy it cold the next day. Oooh, serve it hot or cold with fried chicken! That's it. I need some fried chicken....

But first, here's the recipe:
You'll need a pie crust (we'll discuss that later), mayo (Duke's. It has to be Duke's!), 4 or 5 tomatoes, salt/pepper, basil (optional), shredded cheddar.

First of all, peel and slice your tomatoes. Now, technically, you should get rid of the pulp inside the tomato. Your pie won't be soggy and pulp-laden. But to me, that's the best part. And I have no problem with soggy, so I leave all that in there. You may also prefer to dice your tomatoes instead of slicing. However you decided to slice them, let the tomatoes sit in a colander. Sprinkle some salt on them. Salt is a tomatoes best friend:


In the meantime, work on your pie crust. Pie crusts are ticking me off lately. But I am determined to make my own (at least on occasion, for Pete's sake). So this was the second crust from the Pioneer Woman perfect pie crust recipe. It started out fine...roll it out with Homey's rolling pin since I can't find mine. Must be with my keys...

I roll crusts out on parchment because at least I know that I'm not going to be mad that it stuck to the countertop.

Make sure the crust is going to fit in your pie dish.

See...it still looks hopeful!

Turn it over and fit it in the dish:
See, feeling even more hopeful! It's not perfectly pretty, but it's in there!

Prick the bottom with a fork. We need to bake this a little before we tomato it up. So pop it in a 375 oven for about 8 to 10 minutes. Then gasp when this is what you pull out....

Wha'?!?! Are you even kidding me?? How could this possibly happen? Ree?! What am I doing to your pie crust to make this happen? (Still waiting on her reply on Facebook!)

Anyway, back to the rest of the recipe. While you are somehow destroying a perfect pie crust, chop up your basil and grate your cheese. Have I ever mentioned that I'm not a fan of grating cheese? Really not a fan...


And this is the point where you can be creative...add onion, more herbs, crumbled bacon, whatever you think sounds good. I just wanted to keep this one simple.


Take the shredded cheese (probably about 2 cups will do). Add in the mayo. I admit, I did not measure. I'm horrible about measuring (except I did for the pie crust, I promise!!). I used two big dollops on my pretty orange spatula. I'd say between 1/2 and 3/4 cup of mayonnaise:


Then we just start layering! Tomatoes, basil (or other ingredients you're adding)...


Layer until you've used all the tomatoes, adding salt and pepper along the way. See how I tried to make the pie crust climb back up the sides? Better than it was, I suppose.

Then....
Add the cheese mayo as the top layer.

Bake at 375 for about 30 minutes or until the cheese layer is melty and golden.


My goodness...deliciousness. Ugly crust and all!

Make it...and let me know what I'm doing wrong on this crust shenanigan. Other than the fact that I'm not buying Pillsbury :)

Tuesday, July 20, 2010

Key West Shrimp

Man, this is one of those recipes that is ridiculously easy. It's a perfect way to use up your fresh shrimp this time of year. And there's always the buy one, get one specials on frozen shrimp...perfect for that too! Here's what you need (again...ridiculously easy...)

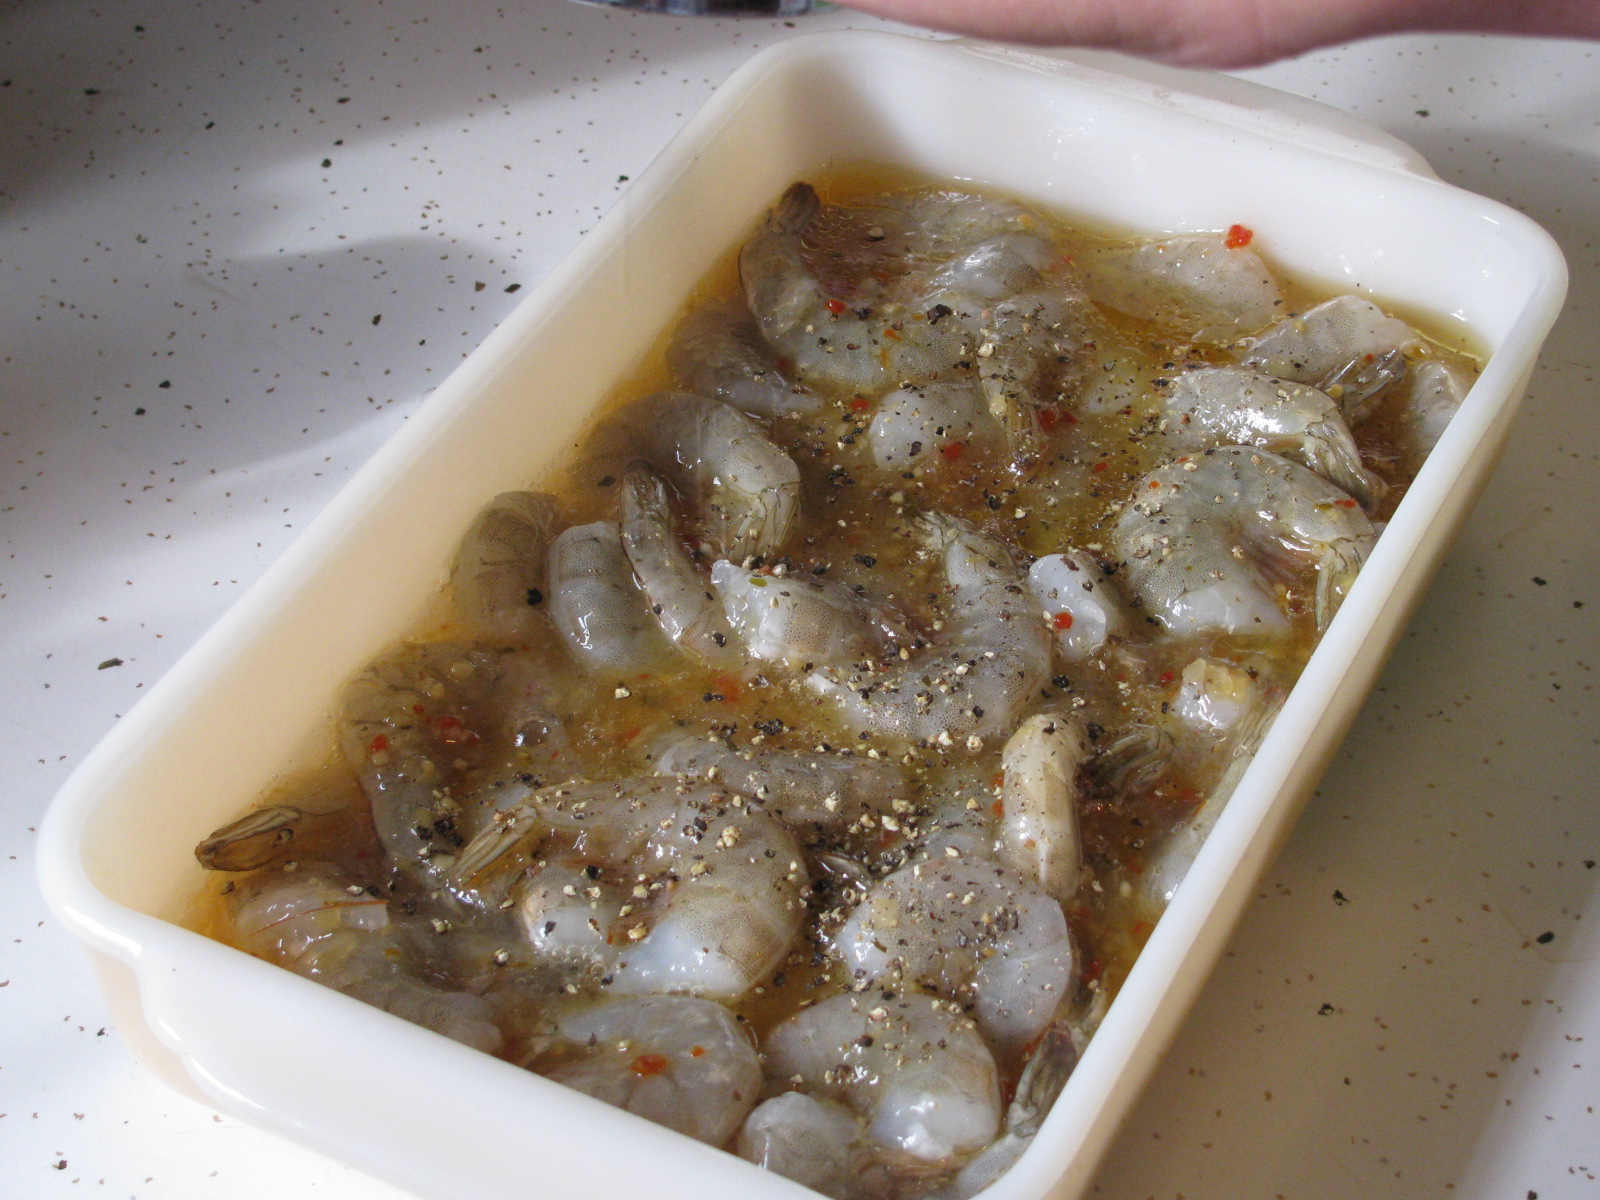
A pound of shrimp (with shells), a bottle of Wishbone Italian dressing (I don't know why it has to be Wishbone...it's just the rule), cracked black pepper, a lemon. (These measurements will feed about 4 people for dinner).


Grab a casserole dish, and toss in your shrimp. Add the whole bottle of dressing. Don't be scared! Add a generous smattering (how's that for detailed instructions!) of cracked black pepper. To me, the more the better!

I ended up only using half of my lemon because it was freakish large. Normally, you would cut a lemon in half and squeeze each half over the shrimp. Toss the rest of the lemon in for good measure.Add butter! I'd say use about 4 tablespoons of butter to dot the top of the shrimp.

Then bake at 375 for about 25 minutes. Check it after 15 minutes, and give it all a good stir.

That's it! Check, check it:

Seriously...who knew something this delicious could be so easy!

Serve with a green salad, corn, and crusty bread. You must serve with a good crusty loaf of bread..how else would you possibly sop up all that delicious sauce?!

A note on the corn: Tonight was chili lime corn. You can make this as easy or as complicated as you like. Since we were cooking inside, I just cooked the corn on the stove, added butter, chili powder and served it with a slice of lime. If you're grilling anyway, just throw the corn on the grill, and serve with some sort of fancy lime butter or aioli and a sprinking of chili powder. Delicious no matter which way you make it!

Tuesday, July 13, 2010

Oatmeal Cream Pies

This is a recipe out of Cottage Living magazine. Did you ever get a Cottage Living? I loved Cottage Living. *Sigh*. Due to the Great Recession, it is no longer published. Such a sad, sad story. I simply adored that Glossy Paged Publication. I have a real issue with GPPs. A slight addiction. And when I find a favorite, it's a real blow to have it jerked from my hands with absolutely no warning! WHY?!

I'm getting a little overly dramatic here (not to say that I didn't really feel this way). But this recipe is from one of the first (if not the first) issues of the fabulous publication (sniff sniff!).


JMom started making these almost immediately, and they are the most wonderful cookie ever! The funny thing is that I'm not a Little Debbie fan. I do like a Swiss Cake Roll, but past that, move over Debbie. Just not a fan of overly processed sweets. So this cookie, to me, is perfection. Make. It. Immediately.

Thank you for your cooperation.

Get any Homeys you have involved...it's easy!For the cookie: 1 1/4 cup butter (softened), 1 cup brown sugar (firmly packed...as usual), 1/2 cup white sugar, 1 egg, 2 tsp vanilla extract, 1 1/2 cups plain ol' flour, 1 tsp baking soda, 1/2 tsp salt, 1/4 tsp cinnamon, 3 cups quick cooking oats.

Before you get ticked at me at the end of the recipe for not reminding you , preheat the oven to 375.

Cream the butter and both sugars at medium speed until, well, creamy. Duh.

Add the egg and vanilla, continue beating.

Mix the dry ingredients together in a bowl, mix well. Gradually add to the butter/sugar deliciousness.It is delicious!

When it's well combined, drop by (you know the drill) rounded tablespoon onto baking sheets. (Make sure you go grab the parchment paper first! Homey knows where it is!)


That's the place Tiny Purple Person! (Don't look at my pantry! No judging!)


Yep, that's it, Homey! We in business.

So, drop 'em, about 12ish to a cookie sheet and bake them for 8-10 minutes.


Deliciousness!

Now let's make the best part!

More butter! (a stick, softened). More sugar! (2 cups powdered sugar). More vanilla! (a teaspoon), and of course...whipping cream (1-2 tablespoons--I used 2, may depend on humidity, and I may have used too much. I had to throw them in the fridge to firm up. Icing was dripping everywhere! Welcome to baking in South Carolina in July!)

Put it all in a bowl! Beat it! Beat the heck out of it til it's fluffy.

Then slather that awesome icing on the "cooled" cookies. (Quotes are because I can't wait that long, but it's recommended. Maybe that's why my icing was dripping to and fro...whatever.)

Then, of course, top it with another cookie! Voila! Place on a pretty plate and pour a glass of milk. (Or have it with your coffee in the morning...again, whatever. That's pretty much how I roll...)Thing 1 and Thing 2 loved them:

Though it did feed their maniacal tendencies...

We tried to let them run it off outside, but we ended up just wondering why someone wasn't stopping by to pick up our children. They're precious. They're smart. They're engaging. Why doesn't someone come over to play with them or take them for a sleepover?! It's beyond us, at this point. I even looked to the skies for a rosy cheeked chick floating down with an umbrella. Didn't happen...another *sigh*

As for the yield on this recipe, I'm gonna go with 18. Here's the 24 hour take on the plate o' cookies:


So go ahead and double it. And don't give many to your children unless you're in with Mary Poppins. If you are...tell her I love her, and to please stop by to chill with these Beasts for a while!

Oh, and JMom...you make your icing differently, and I think I like yours better than the recipe's. Can I put you on the spot to comment and tell me how you do yours? I have forgotten! That why I call you all the time. Because you know things, and I really don't. Thanks, JMom! As per facebook and my other online venue, we all know JMom rocks!

Sunday, July 4, 2010

Peaches & Pecans

I'm still feeling super southern...and you don't get much more southern than peaches and pecans. I love this peachy time of year!

Go ahead and use up a few of those deliciously ripe peaches on this Peach Praline Pie. It's easy!

You need: about 3 cups of peach slices (approximately 4 peaches...I probably could have done 5), 1/3 cup of flour (divided), 1/4 cup sugar, 1/4 tsp salt, 1/4 tsp nutmeg, 1/2 cup light corn syrup, 3 eggs, 1/4 cup plus 2 tbsp of butter, 1/4 cup of brown sugar, and 1/2 cup of chopped pecans.

Oh. And a piecrust. You can use a refrigerated piecrust since they're easier. I actually opted to try PW's piecrust one more time. That's how much I hate having to run to the store. I would rather make it myself than leave my house.

Anyway, go ahead and get your crust nested in your pie pan. Sprinkle it with a teaspoon of flour.


Now grab a mixing bowl and combine 3 tablespoons of flour, the white sugar, salt, nutmeg, corn syrup and eggs.


Beat for about a minute.

Then add 1/4 cup of melted butter and peaches.Have Homey mix it all up!

Now make your praline topping. My mercy, this just makes this pie phenomenal.

Combine the pecans, remaining flour, brown sugar and 2 tbsp of butter with a pastry cutter until it's crumbly. I love brown sugar.

Put the peach filling in the crust, and sprinkle on the topping.

Bake at 375 for 45-50 minutes. After about 35 minutes, check to see if you need to shield the crust to keep it from overbrowning. Is that a word? Overbrowning? I'm gonna go with yes.


Perfection. I still can't make my pies pretty, but it surely is southern heaven on a plate. Especially since the AC was fixed while I was making the pie. Perfection!

Saturday, July 3, 2010

Feeling Southern...Make Hot Tomato Grits

I love grits. I love having grits as a side dish for dinner almost better than I love having grits for breakfast. This is a fantastic recipe that you can serve at a brunch next to poached eggs and fruit (Yum!) or at supper like I did with oven fried pork chops and fresh green beans.

Here's what you need:

A cup of grits, 2 cans of chicken stock, 2 tomatoes (peeled and chopped), 2 cups of cheddar. (I hate grating cheese. Quit judging me).

Oh, and you'll also need your neighbor's kitchen because your A/C is out. Two dishes on the stove and one in the oven would make you cry without A/C in late June. But the show must go on...we'll just cook down the street.

Bring the 2 cans of chicken broth to a boil.
Add the grits, cover the pot, and reduce the heat to low.

After about 10 minutes, toss the tomato in. Just let everyone hang out in there for a few minutes. Give it a taste, and add some salt and pepper if you think it needs it.

Now you're ready to dump in the cheese.Are you even kidding me?! Delicious.

Oh. Know what? I completely forgot one ingredient. Crumbled bacon!!
Out. Of. Control.

Delicious.

Now pull out the radio flyer wagon, and load up your hot pans and pots. Return to your stifling, hot house.


Enjoy!

Thursday, July 1, 2010

The Three D's


This crazy house...This charming and endearing house...There are some rooms I'm happy with, some rooms I can deal with for now, and some rooms that have to be dealt with on some level immediately. These are the rooms that are Dirty, Dingy, and Dated.

At first I can handle the crazy rooms...all the while collecting ideas from magazines, gaining inspiration for the day that I have the time, energy, and money to actually fix the room.

I'm about to show you the absolute worst room in my house. It's horrible, and I can't even believe I'm going to show you...the only reasons I am willing to share are as follows:

1. Most of you have seen the horrible room.

2. I'm confident that my quick fixes will make a huge difference, and afford me the patience to deal with the room until we can rip it off the house and rebuilt it.

Because ripping the back corner off the house is really what needs to happen to this room. Our luxurious master bathroom...

Since we have no business ripping off the corner of our house, some quick cosmetic changes and some storage solutions will have to do for now.

Here's the before pictures. Prepare yourself for the awfulness.

The blue walls. Awful. Jack and Louise were huge fans of Williamsburg Blue.Awful! Still trying to figure out what I want to do with that mirror to the medicine cabinet. And the vanity...still undecided. (Oh! And we found Weezy's teeth in that medicine cabinet. Example number 32 of why you do not comply when the husband says "Close your eyes and hold out your hand". I don't think so, buddy...).

The laundry section. This room really is freakishly large, just a big ol' waste of space...Wastes of space really tick me off....


Why? Why is there a door there? (Leads to the fireplace room of all places! Why?!). Why is there a random piece of cabinetry there? Why, Jack? I have lots of questions! Ugh, I'll be so glad when it doesn't look like that anymore!

Another big, fat WHY:
This, my friends, is my back door. My. ONLY. Back. Door. It makes me cry to think about why anyone thought this would be a good idea. Seriously.

Now, as I complain about it, I will also say that I can deal with this until we rip the house apart in 20 years. We don't do formal entertaining, so I'm not upset about having to meander through the back of the house to get to the yard. Also, Thing 1, Thing 2, and Jake can really do a number on floors, so it's not so bad having this Holding Station to get everyone cleaned up. If it's super bad, I can just throw the beasts into the bathtub. Rather handy!

So, as long as I give up the "luxurious master bath" idea, this room isn't so bad. It's my laundry room and mudroom that just so happens to be my back bathroom, too. And its form and function can't change right now, but Williamburg Blue and wonky storage can change immediately. Stay tuned to see my progress!